
- Penetesting Industry 4.0 IoT Prototype – 5 - 18/04/2020
- Penetesting Industry 4.0 IoT Prototype – 4 - 18/04/2020
- Penetesting Industry 4.0 IoT Prototype – 3 - 18/04/2020
Step 3: Hosting the payload on a Website
To host the payload, we use the inbuilt apache server. Replacing the default “index.html” file with the generated payload file saved in “/var/www/html” folder is essential. We use the command shown in Fig 10 to host a page as shown in Fig 11.
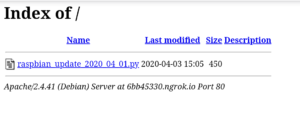
Fig 10: Start an Apache server
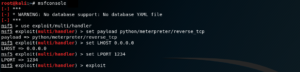
Fig 11: Webserver for hosting the payload
By default, this page is initially hosted on localhost:80. However for hosting the website on a public website, we use ngrok for port forwarding similar to the one we did in step 1. The URL mentioned in the red box shown in Fig 11 can be accessed by the victim over any network.
Now while we wait for the victim to fall into our trap i.e. click on the link and install the payload, we will set up the ‘msfconsole’.
Step 4: msfconsole setup
![]()
Fig 12: msfconsole setup
msfconsole is the command used to initiate the Metasploit framework.
– The command use exploit/multi/handler is a stub that is used to handle the exploits launched outside the Metasploit framework.
– Then we set the payload as python/meterpreter/reverse_tcp.
– LHOST is set as 0.0.0.0 because it is a non-routable address making it invalid or unspecified and hence, untraceable.
– LPORT is set as 1234 (Refer Fig 12)
We can use the command exploit or run to launch the exploit. After this step, we wait for the victim to install the payload. As soon as the victim installs the payload, we get an active session with the victim’s device i.e. Raspberry Pi as shown in Fig 13.
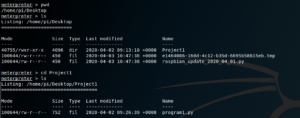
Fig 13: Active session
Step 5: Exploitation
As soon as we get an active session, we enter the meterpreter shell. Actual exploitation of the device begins henceforth.
sysinfo is a command that returns the system info such a device name, OS, architecture and system language. (Refer Fig 13)
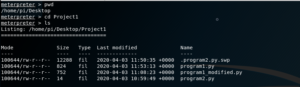
Fig 14: Finding the working directory
pwd command stands for ‘print working directory’. This command helps us to further navigate to different folders and files using commands like cd (change directory) and ls (list). (Refer Fig 14)
Using these commands, we can navigate to the files containing the programs. Now we will try to access the program files.
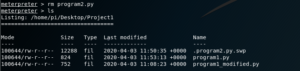
Fig 15: Navigating to the program files
The first file in the list shows that it is already running on the Raspberry Pi. We will now modify the existing programs. To do that we will first delete Program2.py, then download Program1.py and modify it. Save it as Program2.py and then again upload it to Raspberry Pi.

Fig 16: Deleting Program2.py
Fig 17: Downloading Program1.py
Then we download Program1.py using the download command.
(Refer Fig 17)
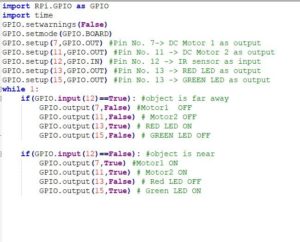
Fig 18: Code saved in Program1
This is the existing code in the file Program1.py (Refer Fig 18). Now we will modify it to display a message “hacked” after an interval of every 10 seconds. (Refer Fig 19)

Fig 19: Program to be saved as Program2.py
Fig 20: Uploading Program2.py and then executing it
Then we upload the modified Program2.py to the Raspberry Pi using the command upload and providing the path of the modified file.
In order to run this file, we have to enter the command shell of raspberry pi. We do this using the shell command. Once we enter the shell, we use the command sudo python program2.py to execute the program. We can see the result on the screen and also the ongoing processes on the Raspberry Pi are disrupted and the same message is displayed on the display/monitor connected to the Raspberry Pi.
These are few of the ways an IoT based industry can be exploited in cyber attacks and cause havoc and disruption leading to huge loss for the industry.