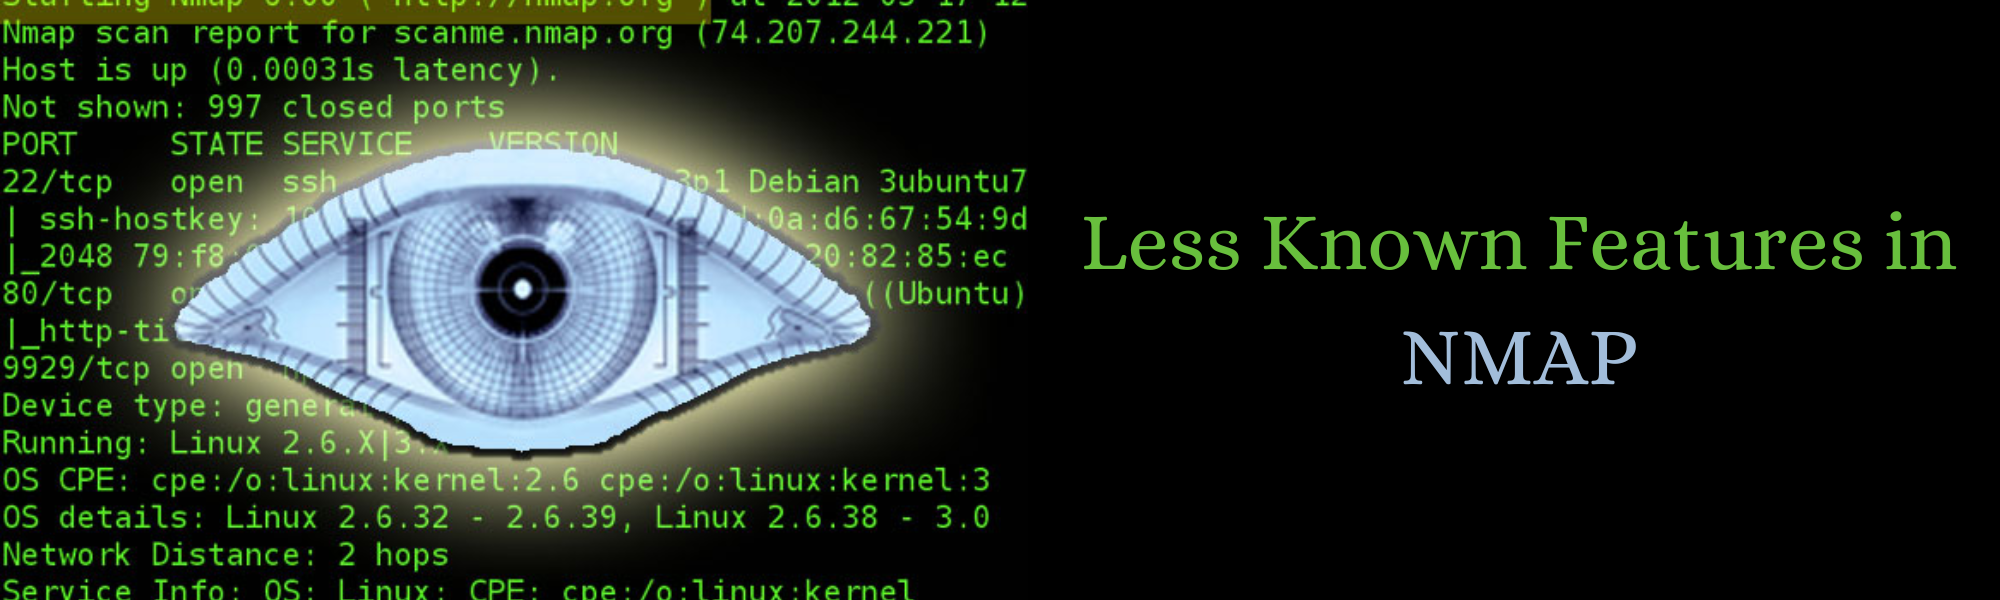

- Less known features of Nmap Tool - 23/04/2023
Introduction
As an information security professional, you need to scan network devices and servers to know more about the security vulnerabilities in networks. In this blog we are going to cover summary of Nmap, installation of Nmap, and some of the less known features of Nmap.
Nmap Security Scanner
Nmap (Network scanner) is a free and open source tool used for network scanning and security auditing. It is quite effective for tasks such as network inventory, managing service upgrade schedules, and monitoring host or service uptime for many systems and network administrators.
Nmap uses raw IP packets in novel ways to determine:
• hosts are available on the network
• services (application name and version) those hosts are offering
• operating systems (and OS versions) they are running
• type of packet filters/firewalls are in use, and dozens of other characteristics
It was designed to rapidly scan large networks, but works fine against single hosts.
Properties of Nmap:
• Flexible: It supports dozens of advanced techniques for mapping out networks filled with IP filters, firewalls, routers, and other obstacles. This includes many port scanning mechanisms (both TCP & UDP), OS detection, version detection, ping sweeps, and more.
• Powerful: Nmap has been used to scan huge networks of literally hundreds of thousands of machines.
• Portable: Most operating systems are supported, including Linux, Microsoft Windows, FreeBSD, OpenBSD, Solaris, IRIX, Mac OS X, HP-UX, NetBSD, Sun OS, Amiga, and more.
• Easy: While Nmap offers a rich set of advanced features for power users, you can start out as simply as “nmap -v -A targethost”. Both traditional command line and graphical (GUI) versions are available to suit your preference. Binaries are available for those who do not wish to compile Nmap from source.
• Free: The primary goals of the Nmap Project is to help make the Internet a little more secure and to provide administrators/auditors/hackers with an advanced tool for exploring their networks. Nmap is available for free download.
• Well Documented: Significant effort has been put into comprehensive and up-to-date man pages, whitepapers, tutorials, and even a whole book!
• Supported: While Nmap comes with no warranty, it is well supported by a vibrant community of developers and users.
Installation
1. Windows: Just log on to https://nmap.org/download and download the installer of the stable version. Execute that file and install it, then you are good to go. The automatic installer will configure Nmap for you within no time.
2. Linux: Open the terminal and type in the following commands to install nmap
• CentOS/Fedora: sudo dnf install nmap
• Ubuntu/Debian: sudo apt-get install nmap
3. MacOS: Mac users have an automatic installer. You just need to run the Nmap –mpkg file and Nmap is ready to run on your system.
Feature 1: Using Nmap for CVE detection
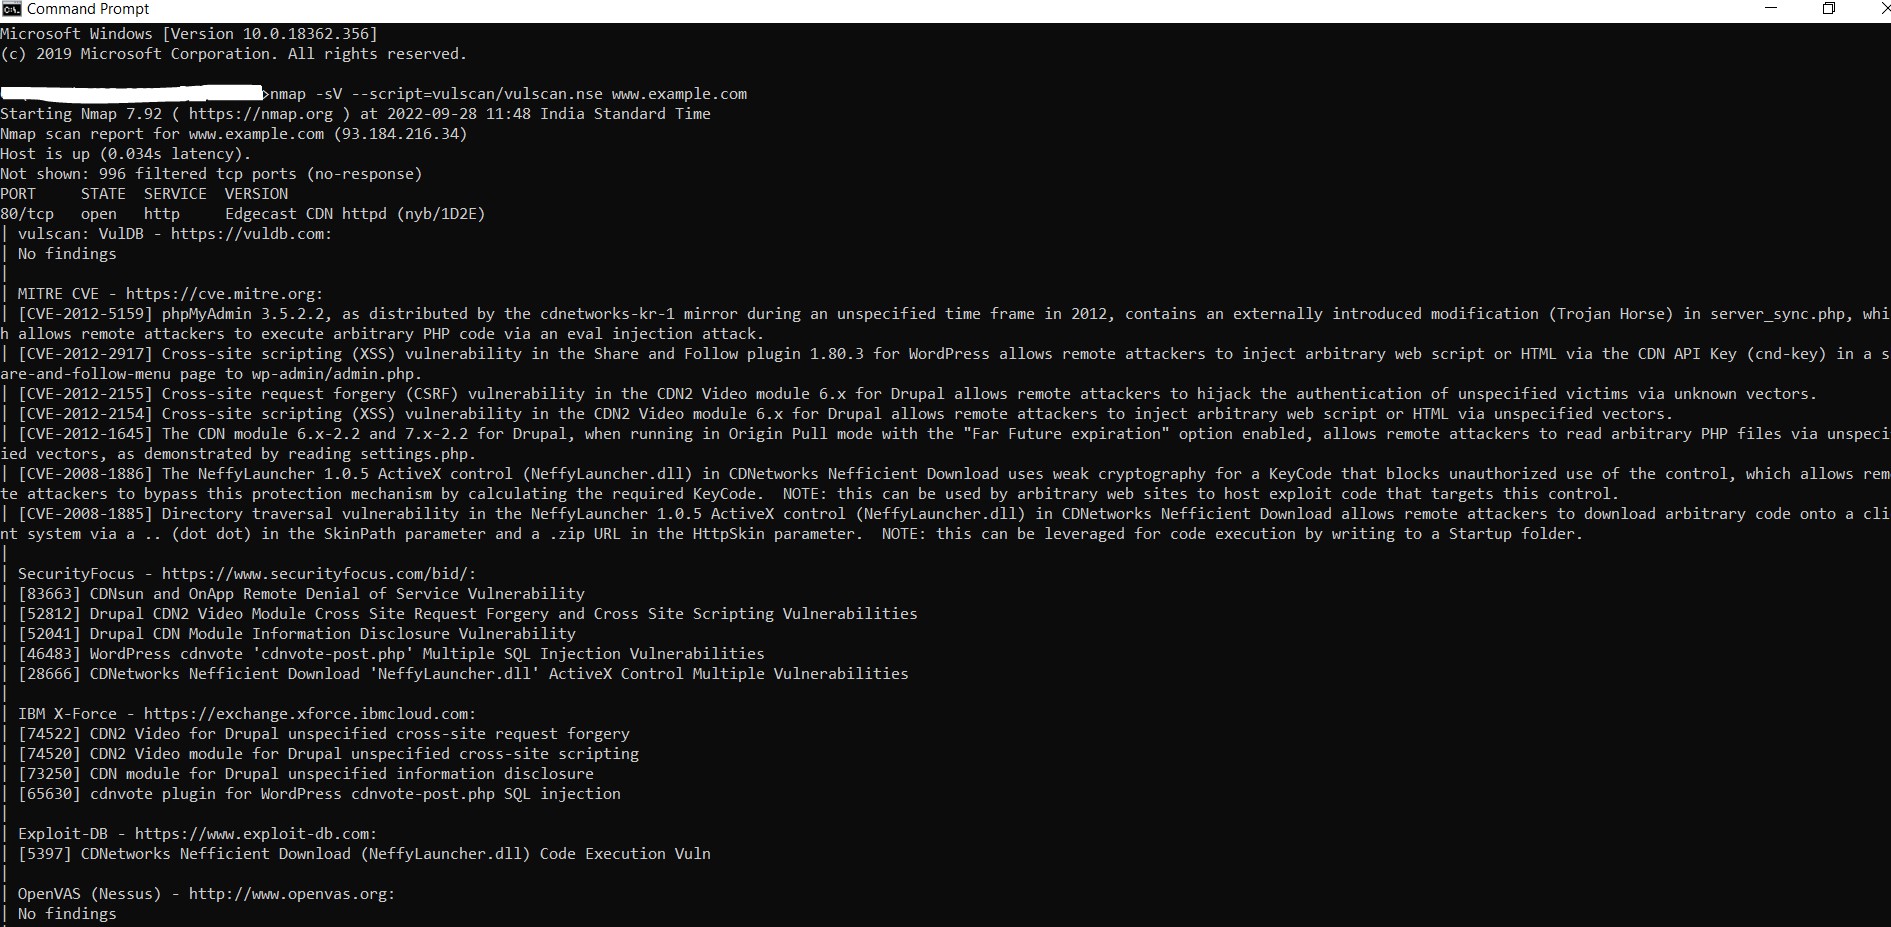
Many system administrators are unaware of this feature offered by Nmap — detection of CVE. The Common Vulnerabilities and Exposures (CVE) Program is identifies, defines, and catalogs publicly disclosed cyber security vulnerabilities. CVE detection is one of the best features that is under-utilized by people. There is a predefined script present in the command in Nmap that allows users to execute this process. One can use these predefined scripts or own their Lua programming language to derive a specific functionality that can help in CVE detection. Two of the most popular vulnerability/CVE detection scripts found on Nmap NSE are nmap-vulners and vulscan, which will enable you to detect relevant CVE information from remote or local hosts.
i. Nmap vulscan: Vulscan queries its own local CVE databases, hosted on the client performing the scan. These local databases include the following files: scipvuldb.csv, cve.csv, securityfocus.csv, xforce.csv, expliotdb.csv, openvas.csv, securitytracker.csv, osvdb.csv.
In order to use this NSE script, we’ll need to clone its github repo. The following commands will install the vulscan script along with all the databases mentioned:
git clone https://github.com/scipag/vulscan scipag_vulscan
OR
• Manually download the zip folder from https://github.com/scipag/vulscan
• Extract it here – C:\Program Files (x86)\Nmap\scripts
• Rename Folder to vulscan
Command: nmap -sV –script=vulscan/vulscan.nse www.example.com
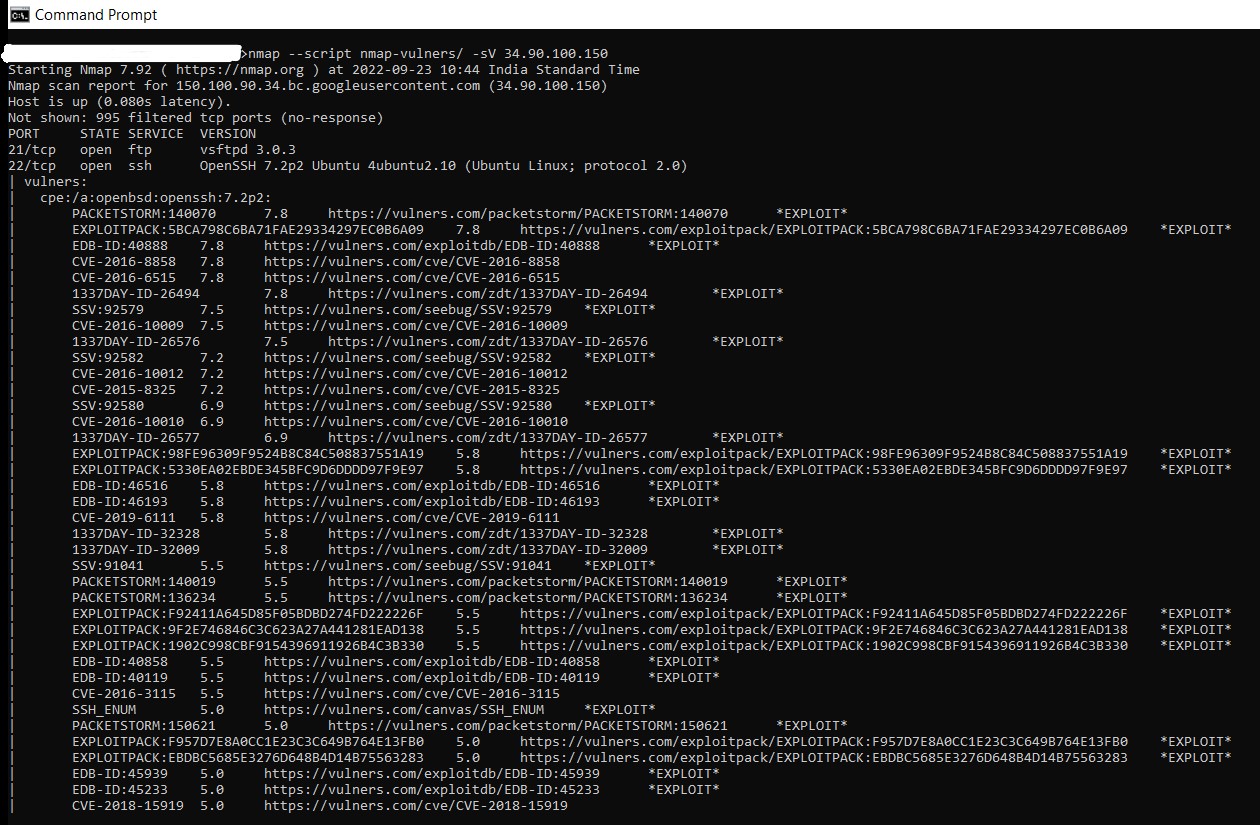
ii. Nmap-vulners: It is one of the most famous vulnerability scanners in use. Let’s explore how to install this tool, as well as how to perform a simple CVE scan. Copy and paste the following two lines to install the nmap-vulners:
cd /usr/share/nmap/scripts/
git clone https://github.com/vulnersCom/nmap-vulners.git
OR
• Manually download the zip file from https://github.com/vulnersCom/nmap-vulners
• Extract the files here – C:\Program Files (x86)\Nmap\scripts
• Rename Folder to vulners
Command: nmap –script nmap-vulners/ -sV 11.22.33.44
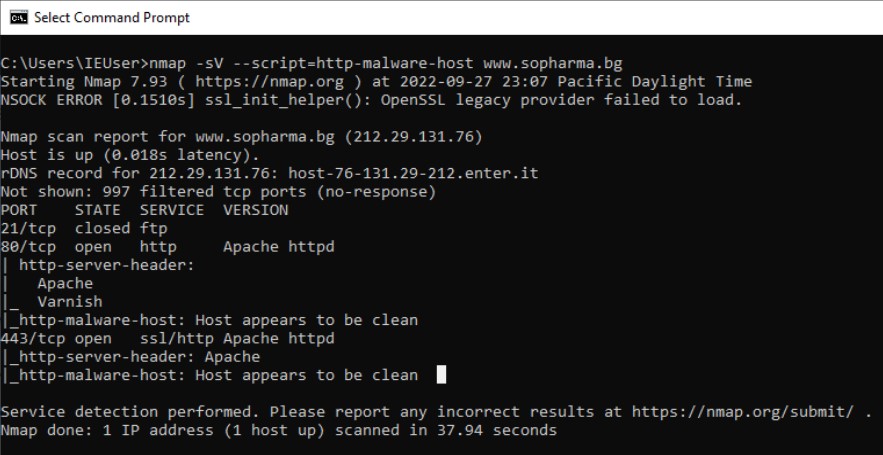
Feature 2: Detecting malware infections on remote hosts
Nmap is able to detect malware and backdoors by running extensive tests on a few popular OS services like on Identd, Proftpd, Vsftpd, IRC, SMB, and SMTP. It also has a module to check for popular malware signs inside remote servers and integrates Google’s Safe Browsing and VirusTotal databases as well. Examples include smtp-strangeport, which watches for SMTP servers running on unusual port numbers, and auth-spoof, which detects identd spoofing daemons which provide a fake answer before even receiving a query. Both of these behaviors are commonly associated with malware infections.
A common malware scan can be performed by using:
nmap -sV –script=http-malware-host
Or using Google’s Malware check:
nmap -p80 –script http-google-malware infectedsite.com
Output example:
1. 80/tcp open http
|_http-google-malware.nse: Host is known for distributing malware.
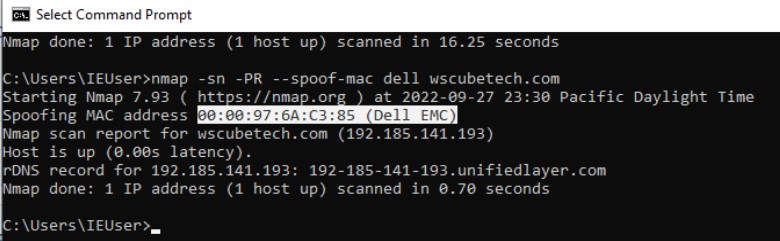
Feature 3: Spoofing MAC address
Asks Nmap to use the given MAC address for all of the raw ethernet frames it sends. This option implies –send-eth to ensure that Nmap actually sends ethernet-level packets. The MAC given can take several formats. If it is simply the number 0, Nmap chooses a completely random MAC address for the session. If the given string is an even number of hex digits (with the pairs optionally separated by a colon), Nmap will use those as the MAC. If fewer than 12 hex digits are provided, Nmap fills in the remainder of the six bytes with random values. If the argument isn’t a zero or hex string, Nmap looks through nmap-mac-prefixes to find a vendor name containing the given string (it is case insensitive). If a match is found, Nmap uses the vendor’s OUI (three-byte prefix) and fills out the remaining three bytes randomly. Valid –spoof-mac argument examples are Apple, 0, 01:02:03:04:05:06, deadbeefcafe, 0020F2, and Cisco. This option only affects raw packet scans such as SYN scan or OS detection, not connection-oriented features such as version detection or the Nmap Scripting Engine.
Nmap lets you spoof your MAC address using –spoof-mac
Command: nmap -sn -PR –spoof-mac
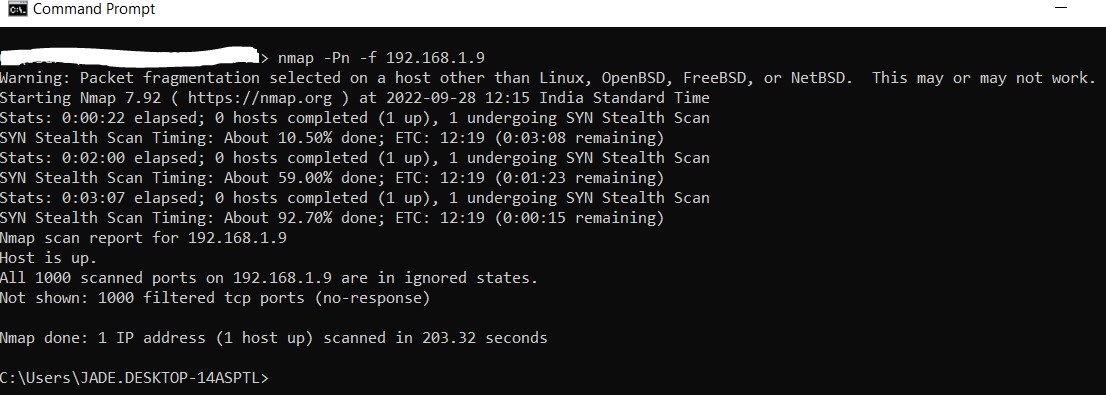
Feature 4: Firewall Evasion
The -f option causes the requested scan (including host discovery scans) to use tiny fragmented IP packets. The idea is to split up the TCP header over several packets to make it harder for packet filters, intrusion detection systems, and other annoyances to detect what you are doing. Fragmentation is useful since fragments are passed to the target machine uninspected from the firewall. Fragmentation is more effective when we split TCP header in different packets, in nmap we can request a fragmentation with the “-f” option which will request a fragmentation of 8 byte chunks, while it is even possible to use “-f-f” to achieve 16 byte chunks, or still we can specify the chunk size by using “–mtu” and specifying the chunks. Don’t also specify -f if you use –mtu. The chunk size must be a multiple of eight.
Fragmentation is only supported for Nmap’s raw packet features, which includes TCP and UDP port scans (except connect scan and FTP bounce scan) and OS detection. Features such as version detection and the Nmap Scripting Engine generally don’t support fragmentation because they rely on your host’s TCP stack to communicate with target services.
Command: nmap –Pn -f 223.23.23.12
Conclusion
These are various ways you can improve your Nmap using capabilities. These commands and examples can help you to understand and explore the Nmap monitoring tool. Have a look at the entire blog keeping in mind the commands that are useful for your systems. There are some specific sets of commands for every platform and UI, but on the flip side, several of them are common and can be used in all of them.
Nmap is one of the most complete and accurate port scanners used by infosec professionals today. With it, you can perform simple port scan tasks or use its powerful scripting engine to launch DOS attacks, detect malware or brute force testing on remote and local servers.
Here we covered three less known features of Nmap, but there’s a lot more to discover.